Data Collection Checklist
Overdenture Conversion
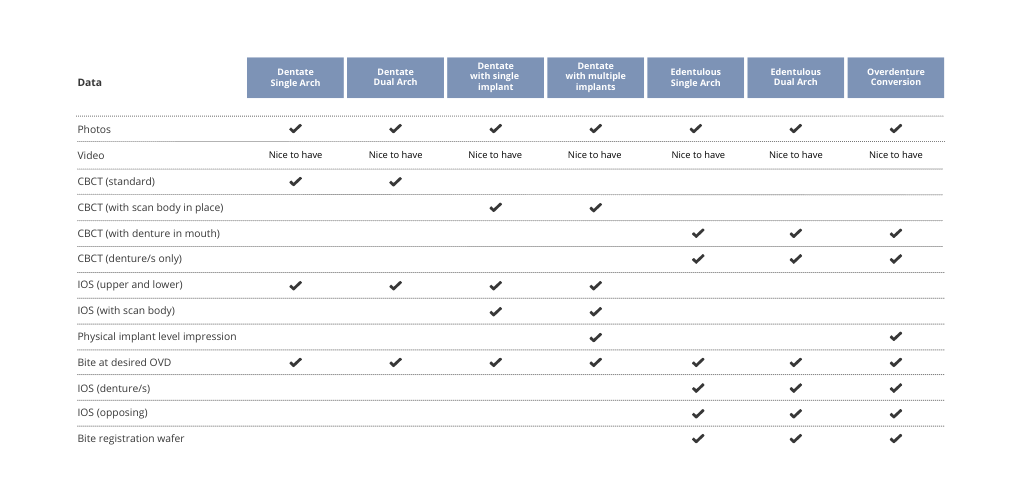
This checklist outlines the requirements for obtaining photo, impression and CBCT data that will be appropriate for planning and ordering an All at Once® Implant Bridge and guides. This checklist is used for patients who have overdentures.

Before proceeding, please ensure you have the following data available for file transfer:
1. Patient photos:
External:
- Front - lips retracted and teeth apart
- Front x3 - smile, biting, and rest
- Profile x3 - smile, biting and rest
- Above / below
Internal:
- Front MI with denture
- Front open - with and without denture
- Front protrusive with denture
- Right and Left MI with denture
- Right and Left without denture
- Maxilla (occlusal) - with and without denture
- Mandible (occlusal) - with and without denture
Denture:
- Occlusal
2. IOS or digital impressions:
- Export file format in STL or PLY
- 4 digital files - denture, opposing, bite, upper / lower physical impression or upper denture, lower denture, bite,
- upper / lower physical impression
- Capture outside of the denture. Do not scan inside of denture
- Capture all of the teeth in the dentate arch, and as much of the soft tissue as possible
- Do not scan edentulous arch
- Capture bite at the planned vertical dimension (use a leaf gauge if necessary)
- For arch/s with implants, provide digital file of physical implant-level impression (take physical impression and
- convert to STL or PLY)
- Scans have been captured following recommendations detailed in AuDentes® IOS Scan Protocol
- Scans have been captured following recommendations detailed in AuDentes® Impression Taking Protocol
3. CBCT:
- Export file format - DICOM, uncompressed axial images
- Scans have been captured following recommendations detailed in AuDentes® CBCT Scan Protocol - Edentulous
